Anyone looking for an inexpensive way to give a good quality recycled/upcycled gift?
Come and check out my shop Jeans and a Sweater.
Use the coupon code HOLIDAY12 at checkouts.
Receive 15% off the prices listed in the shop.
Easy Peasy!
Happy Holidays!
Monday, December 3, 2012
Sunday, December 2, 2012
Blue Screen Update
Well...my 15 y/o genius, who is my computer, man said that we will need to buy new RAM to replace the old RAM.
Hey...It's a much cheaper fix than I thought I'd be getting off with!
YAY!
I guess I'll be heading to Best Buy really soon...
Hey...It's a much cheaper fix than I thought I'd be getting off with!
YAY!
I guess I'll be heading to Best Buy really soon...
Thursday, November 29, 2012
Blue Screen
CRASH! CRASH! CRASH!

The dreaded blue screen of death has appeared to me 3 times in the last month on this computer.
And only to me...
Am I doing something wrong? Or is it almost time to get a new computer?
I certainly hope not!
The dreaded blue screen of death has appeared to me 3 times in the last month on this computer.
And only to me...
Am I doing something wrong? Or is it almost time to get a new computer?
I certainly hope not!
Friday, November 9, 2012
I need witnesses...
I've decided that I want to be prepared for the holidays...weight and diet-wise. I want to be in a "better place" so that when at a gathering I should be able to eat anything I want...in moderation.
I have decided that I want to go on a "diet". Basically, eat more healthy. Stay out of the Halloween candy. Control my portions.
I have been saying this for weeks but I keep eating junk!
I just can't seem to help myself!
I figured that if I have witnesses and maybe someone to embark in this undertaking with me...It'll be harder for me to slip.
What do you say?
Do I have any takers?
If not to join me...then at least to help keep me honest!
Thursday, November 1, 2012
Lame Costumes!
I hope everyone was able to enjoy Halloween even in the wake of the storm. My thoughts are with those that are facing hard times.
On to happier things...
Hey, I had nothing to do with either one of them!
Here is Smarty Pants...

Can you guess who he is? I'll give you a hint...sci fi fans will have a better chance at guessing. Nobody else has a chance!
He didn't go trick or treating but he did this at school.
Here is the Picky One...

He certainly isn't picky about the clothes (or costumes) he wears!
He was "The Doctor" at the Halloween party he went to a week and a half ago. Once again, sci fi fans will understand that one.
The kid didn't feel like getting dressed up for school. He came up with this one about 20 minutes before he went out trick or treating. And I have no idea what he is...I think he said "Green Man" and "I'm definitely not a leprechaun!" (when Hubby suggested such a ridiculous idea).
Hubby thought it was awesome...
There is no accounting for taste here!
On to happier things...
Hey, I had nothing to do with either one of them!
Here is Smarty Pants...
Can you guess who he is? I'll give you a hint...sci fi fans will have a better chance at guessing. Nobody else has a chance!
He didn't go trick or treating but he did this at school.
Here is the Picky One...

He certainly isn't picky about the clothes (or costumes) he wears!
He was "The Doctor" at the Halloween party he went to a week and a half ago. Once again, sci fi fans will understand that one.
The kid didn't feel like getting dressed up for school. He came up with this one about 20 minutes before he went out trick or treating. And I have no idea what he is...I think he said "Green Man" and "I'm definitely not a leprechaun!" (when Hubby suggested such a ridiculous idea).
Hubby thought it was awesome...
There is no accounting for taste here!
Tuesday, October 23, 2012
Cranberry Chicken Fricassee
As always, I was looking for a recipe that maybe the Picky One would eat...

I ended up taking an old Mr. Food recipe and changing it up. It started off as Simple Turkey One Pot. And ended up as Cranberry Chicken Fricassee. I changed a bunch of things, took some out and added some others.
For one, I didn't have a turkey breast...so chicken was going to have to do.
I don't really like stuffing...so instead, I put in Yukon gold potatoes.
I wanted a sauce for this stew, so I used a can of whole cranberry sauce instead of some Craisins.
And nobody but me will eat 'shrooms on a regular basis...so I just left those out.
And then I added a bunch of herbs/spices that he didn't think of.
Where did I get the name for my new recipe?
When I was a kid, one of my Mom's friend's was a horrible cook. (Everyone knew it but her. And I know that my sis and mom know who I'm talking about.) But the one thing she could cook well was chicken fricassee. I have never had it before...nor since. When I scooped the leftovers into a container, it dawned on me that it looked like her old standby that I once loved. So it will now be called fricassee!
Here is my new recipe that my Picky One gave a thumbs up to...

Cranberry Chicken Fricassee
2 skinless boneless chicken breast
2 leg quarters, separated at joints (next time I will probably remove some of the skin)
10 Yukon gold potatoes, approx 1/2 slices (I sliced the long way, 'cuz it meant I'd be doing less work)
1/2 bag of baby carrots (next time, I'll use a whole bag, they were tasty!)
1 small cooking onion, chopped
1-15 oz can whole cranberry sauce
salt and pepper to taste
2 tsp dried thyme
2 tsp dried basil
dusting of garlic powder (I'm not sure how much of either one of these I used, a generous sprinkle)
dusting of powdered ginger
Spray the crock pot before you do anything. (I forgot, I hope it's not too hard to clean! It's too heavy for me so that's Hubby's job.)
Season with salt and pepper.
Place the sliced potatoes in layers on top of the chicken. Salt and pepper each layer.
Sprinkle liberally with garlic powder. Sprinkle basil and thyme over the top too.
Add onion, carrots and cranberry sauce.
Sprinkle ginger over the cranberry sauce.
Put your lid on and turn on the pot. 4-5 hrs on high or 7-8 hrs on low. (I'm just guessing here the thermostat on my 7 quart crock pot is screwy!)
I just asked Smarty Pants what he thought of the meal. He said that "it probably needs more juice/sauce." We had enough but there probably won't be enough for the leftovers. I guess we'll cross that bridge when we come to it. I'm not sure if I want to add chicken broth to it, but it'll either be that or next time I can add another can of cranberry sauce (either whole or jellied). If anyone makes it and finds the perfect solution...let me know!
Monday, October 8, 2012
Pumped up Shepard's Pie
I needed a casserole type dish that we would all eat and that Smarty Pants could/would heat up for himself since us parents did not plan on being home when he was supposed to be eating dinner. Neither one of us were planning on being home until drive time, then heading back to the meet if it was still going on.
Picky One had his first high school gymnastics meet and we both wanted to watch, starting at 5pm. Smarty Pants had his math class starting at 6pm (at the local university). He should be eating by 5:30. Since hubby and I didn't plan on being home, I had to make something easy and quick...and hopefully tasty.
I had told hubby that i would make a shepards pie. He told me that I had better make a salad 'cuz he doesn't really care for it.
Hey when we went to an Irish pub recently with Picky One and he said he liked it...I had to give it a try. Right?
I searched Pinterest and came out with 5 different recipes that each had their own special ingredients. I don't think I really need to give credit to each of the 5...do I? I took the special ingredients from all of them and combined them and totally changed them around to make my totally different and easier/quicker version of the Shepard's pie (some call it Cottage pie)...I will put an * by each of the special ingredients. All of the ingredients are in italics. I hope this isn't too confusing the way I did this.

Prepare a 13" x 9" pan with cooking spray. Set aside. I am not positive what temperature or for how long to cook this. we all just took bowl fulls and nuked (microwaved) it for ourselves. The average of all of the other recipes gives me 375 for 20 mins or until light light browned or bubbly.
salt and pepper to taste
1-2 Tbs Worcestershire sauce *
2 tsp dried thyme *
Drain off excess fat/liquid.
1/2 cup water
2 packets of brown gravy mix
16 oz bag of frozen vegetables of your choice (I used mixed veggies: corn, peas, green beans and carrots) defrost if you will be putting it directly into the oven when complete. Don't bother if it's waiting until later. Place as the second layer on top of the meat. I think that keeping it frozen help to keep the veggies green. Boil :
Picky One had his first high school gymnastics meet and we both wanted to watch, starting at 5pm. Smarty Pants had his math class starting at 6pm (at the local university). He should be eating by 5:30. Since hubby and I didn't plan on being home, I had to make something easy and quick...and hopefully tasty.
I had told hubby that i would make a shepards pie. He told me that I had better make a salad 'cuz he doesn't really care for it.
Hey when we went to an Irish pub recently with Picky One and he said he liked it...I had to give it a try. Right?
I searched Pinterest and came out with 5 different recipes that each had their own special ingredients. I don't think I really need to give credit to each of the 5...do I? I took the special ingredients from all of them and combined them and totally changed them around to make my totally different and easier/quicker version of the Shepard's pie (some call it Cottage pie)...I will put an * by each of the special ingredients. All of the ingredients are in italics. I hope this isn't too confusing the way I did this.

Prepare a 13" x 9" pan with cooking spray. Set aside. I am not positive what temperature or for how long to cook this. we all just took bowl fulls and nuked (microwaved) it for ourselves. The average of all of the other recipes gives me 375 for 20 mins or until light light browned or bubbly.
Sautee in large fry pan with following other ingredients:
1-1/2 lbs ground beefsalt and pepper to taste
1-2 Tbs Worcestershire sauce *
2 tsp dried thyme *
Drain off excess fat/liquid.
Mix together (in separate bowl):
1 bottle of beer *1/2 cup water
2 packets of brown gravy mix
Add to meat mixture with:
2 Tbs tomato paste*
1/2 tsp ground cinnamon*
1 tsp dried thyme*
1 tsp dried parsley*
Stir well to combine. Simmer down until you have a nice thick sauce.
You now have the bottom layer precooked. Pour into prepared pan. Now, take a
3 cups of water.
Take off heat. Mix in :
2 packets of mashed potato flakes (I used one butter, one roasted garlic)
1 cup milk
1 tsp shallots (optional)
1/2 cup shredded colby jack cheese
You have now finished your final layer. Spread it on top of the vegetables. Gently! It's a tough layer to spread. Mine was really thick. I'm guessing it was because of the cheese.
You're done!
Either dish it up and nuke it like we did. Or put in the 375 degree oven for 20-25 mins.
Enjoy!
Let me tell you...My kids loved it! I loved it!
And wait for it...
My hubby who said he doesn't like it...Loved it too! He actually had seconds and no salad!
Yay! We have another regular to add to our menus!
Monday, October 1, 2012
Belated Pintember: Gluten-free Pumpkin Corn Bread
I've been a little delinquent on my Pintember posts lately but this morning I just made my gluten free version of the the pumpkin cornbread I made last week. I had saved the other half of the can for some other recipe, not sure what. I had to make it gluten free and spice improved. The first one was "missing something" as I had heard from both one son and my hubby.

I have decided that I really do not love gluten free breads. I would rather skip it and have a cracker instead. There are plenty of good gluten free crackers around. But when I had tasted the regular version of this recipe, I knew I had a good thing to convert. It was already gritty, thanks to the cornmeal. What difference would it make if I put gritty gluten free flour in it. NONE!
Here is the new improved and gluten free pumpkin cornbread recipe...
1/2 cup sorgum flour
1/2 cup white rice flour
1/2 tsp xanthan gum
1 Tbs baking powder
1 Tbs cinnamon
1/2 tsp ground ginger (I'm not a fan of ginger, but it's great with pumpkin!)
few scrapes of fresh nutmeg (I do not like nutmeg but my MIL introduced me to the fresh stuff and it makes quite a diff!)
1 cup corn meal
1/2 cup dark brown sugar
2 eggs, beaten
1/2- 15oz can of solid pack pumpkin (approx 3/4 cup)
1/4 cup light olive oil
1/4 cup applesauce, sweetened (it needed a little more sweetener and moistener)
Preheat oven to 400. Mix together all of the dry ingredients in a medium mixing bowl until well combined. Mix all of the wet (remaining) ingredients into a small mixing bowl until well combined. Pour wet into dry and mix until just combined. Prep 8 x 8 baking pan with oil spray. Pour and spread batter into pan. it will be thick. Bake for 22-28 minutes or until toothpick comes out clean. Enjoy with butter or without. I ate mine without!
Brought some over for my gluten free taste tester who lives across the street. She said it was a keeper recipe.
Yay!
I almost forgot...Here is the inspiration pin...
Wednesday, September 26, 2012
Pintember: Pumpkin Corn Bread
I know...
I've missed a bunch of days.
First, I had my aunt come visit me from Manhattan. She took us out to dinner for our 20th wedding anniversary at Black and Blue restaurant. You can see their menu here. We had a fabulous meal! (With enough for leftovers the next day's dinner.) Then, when the boys went to see How to Train Your Dragon, we went to an art show in Lewiston, NY.
I hit the mother-load! And I didn't have to pay for any of it! My aunt bought me a pair of unique beaded (lamp-work) earrings, an art deco style pair of hanging chain sparkly earrings, a silver/blue Swarovski crystal bracelet, a bottle of Rosebud Rose wine and to top it all off...a bag of fresh kettle corn to share with her (she'd never had it before) and my friend Angela!
Then after she left...I wasn't feeling too well...
Anyway... I need to get back to Pintember...
This morning I went on my normal morning browse through the pins of who I follow. I found a recipe that I couldn't get off of my mind...Pumpkin Corn Bread. I had to make it!
It sounded so easy! And it was too!
It just came out of the oven...it smells sooo good!
And looks sooo good!

It is wonderful! But ,a little on the dry side. It will need to be served with butter. I had a feeling it was going to be when I put the batter in the pan. It was really thick. I think I'll have to make a slight change next time I make it.
And I will definitely be making it again! I think It might be the new standard bread for Thanksgiving dinner!
I think I need to try to make this gluten free next time! It should be easy. (Then I can have more than just one tiny piece!)
This is the pin I got the recipe from...
I did make one change. Instead of using light brown sugar and molasses. I just used dark brown sugar. I probably need to add a little bit more for the liquid content.
And now I still have half a can to use up...
I did see online today that it was National Pancake Day...
How about some gluten free pumpkin pancakes...?
Friday, September 21, 2012
Pintember: Banana Pancaked Revisited
I made these...

about a week and a half ago, here.
I liked them but they were more of a crepe consistency than a pancake. I wanted a pancake. When I think of crepes...I want them to be filled. And I just can't be bothered to do that for myself.
So I just revisited the recipe for lunch. To 2 eggs, I added in 2 tablespoons of gluten free Bisquick. But this time I only had a half of a banana, mashed. (It was left over from Picky One's lunch that I had made this morning...peanut butter, banana and honey sandwich.)
The pancake wasn't very sweet, and it was a little dry. I bet that the perfect mix would include 1-1/2 tablespoons of flour/Bisquick and a whole banana.

I'll get it right...one of these days!
Thursday, September 20, 2012
Pintember: Leather Cleaner
My mother in law has great taste in furniture. She also gets tired of it in a shorter period of time than the average person.

A great portion of our furniture is from my in laws house, 'cuz they have either moved or just redecorated.
A bunch of months ago they gave a light mossy green leather couch. Nice but with darkened areas from use. Now with my kids (and their friends) eating on it...it now has some food stains. Apparently the reason why it is so bad is because it is a raw leather. It is colored but not coated. I think that is the right term for it. If not? hey...you know what I mean!
So I got tired of looking at the food spots and used this pin to help me clean it...
I had taken the recipe for the ultimate spot cleaner from there so I figured it would work...
Umm...maybe not...
I know that you are supposed to spot test cleaners first in an inconspicuous place but I didn't...
I'm not going to bother taking a picture of the "fail".
Umm...
Now what?
Hey, we knew this couch was not going to last that long...
Wednesday, September 19, 2012
Pintember: Impossible Pie Breakfast Muffins

My 10th grader eats breakfast at 6:30am because his bus comes at 6:55.
He's not allowed to use the toaster 'cuz it is waaay too loud and will wake up the other 3 people in the house up to an hour earlier than necessary. So he eats lots of cold cereal and oatmeal (from the packets) and a yogurt. We can turn off the beep on the microwave, not on the toaster. And he alternates having cereal every morning with having breakfast Hot Pockets, on the other mornings. Hot Pockets get expensive after a while!
So I have decided to try making him (as well as everyone else) egg based breakfasts every once in a while. At least I know what goes in them and they are much cheaper!
I got the idea of doing the muffins from Pinterest. No surprise there!

I told my hubby about this recipe and he said that he didn't like eating reheated eggs so I decided to make Bisquick Impossible Pie muffins. We are always reheating Impossible Pie leftovers! We usually make the savory kind that are similar to a quiche.
So tonight, I decided to make an Impossible Pie for dinner and make the breakfast muffins at the same time.(Check out the many different types of pies you can make with Bisquick here.)
One and a half hours later...I had both tonight's dinner and tomorrow's breakfast done.

If there are any muffins left after everyone has eaten breakfast, I will throw the rest in the freezer for another day.
I wish I could give you a recipe but I've been making these pies for so long that I just throw them together with no measuring except for the batter. That happened to fit perfectly in the pan.
3 eggs, beaten
1 cup milk, I usually use skim
1/2 cup Bisquick mix
Just whisk it all together and pour it over the extras (like sausage, veggies and cheese, etc.) you put in the muffin tins.
Tuesday, September 18, 2012
Pintember: Modesty Panel
I have a few shirts that show just a little bit to much cleave for my teenage sons. I usually just wear a ribbed tank top underneath them.
And I usually pic those tanks that should not be worn out in public on their own. You know which ones I mean...The ones with that are shrunken, stretched out or way too tight or just pit or ordinary stains somewhere else on the shirt that can't be seen when worn under something else.
Come on ladies...'fess up! We all do it! With t-shirts as well as tanks. (I bet some men even do it!)
Well, I got this idea while on Pinterest...that is what the site is for isn't it?

But..I am way to lazy! That would mean I would have to either sew on snaps or sew it to the shirt itself. I needed to find an easier way!
So I just chopped up the nasty old ribbed tank I usually wear underneath things anyway instead! I figured that if I ruined it...it wouldn't matter anyway. So, I gave it a try!

And I usually pic those tanks that should not be worn out in public on their own. You know which ones I mean...The ones with that are shrunken, stretched out or way too tight or just pit or ordinary stains somewhere else on the shirt that can't be seen when worn under something else.
Come on ladies...'fess up! We all do it! With t-shirts as well as tanks. (I bet some men even do it!)
Well, I got this idea while on Pinterest...that is what the site is for isn't it?
But..I am way to lazy! That would mean I would have to either sew on snaps or sew it to the shirt itself. I needed to find an easier way!
So I just chopped up the nasty old ribbed tank I usually wear underneath things anyway instead! I figured that if I ruined it...it wouldn't matter anyway. So, I gave it a try!

I cut off the outer binding on the arm holes. Then I put the tank back on and marked it where it came just past my rib cage. Took it back off...And chopped of the bottom too.
It was much more comfortable than wearing the tank as it was before! It almost didn't feel like I was wearing anything under the other shirt. And the one thing that I thought might happen at some point during the day, did not. I was afraid that it would slide up and bunch. Nope! YAY! A great solution!
I think I'll be doing this with all of my nasty tanks!
Hey...and I figure I have the bottom piece to play with...
I've got another idea...for another day!
Monday, September 17, 2012
Pintember: Avocado as Mayo
I have been trying to eat as healthy as I can deal with lately. I'm trying to keep both my sugars and my fats down. When playing on Pinterest a while back I saw these 2 pins...

and

Yes, they do look kind of gross! I know!
But if you like avocados...this is definitely the way to go! These 2 pins inspired me to make a tuna salad with mashed avocado instead of mayo. Yes, the avocado still has fat, but it's the good kind.

It was sooo good! So healthy...and so easy!
4" piece of cucumber, diced
1/3 of a red pepper, diced
1 Tbs onion, finely chopped (I used regular cooking onions)
1/2 avocado, mashed
Dash of lemon or lime juice (to prevent the avocado from browning)
Mix together all ingredients. Enjoy on crackers (I used Glutino gluten free, original flavor) or as a sandwich.
After making this substitute...I think I might have to see what else I can use an avocado for...YUM!
Now...If I could just convince my family to try it!
Not !
and
Yes, they do look kind of gross! I know!
But if you like avocados...this is definitely the way to go! These 2 pins inspired me to make a tuna salad with mashed avocado instead of mayo. Yes, the avocado still has fat, but it's the good kind.

It was sooo good! So healthy...and so easy!
Tuna Avocado Salad
1-5 oz can of tuna, drained (I use solid white packed in water)4" piece of cucumber, diced
1/3 of a red pepper, diced
1 Tbs onion, finely chopped (I used regular cooking onions)
1/2 avocado, mashed
Dash of lemon or lime juice (to prevent the avocado from browning)
Mix together all ingredients. Enjoy on crackers (I used Glutino gluten free, original flavor) or as a sandwich.
After making this substitute...I think I might have to see what else I can use an avocado for...YUM!
Now...If I could just convince my family to try it!
Not !
Sunday, September 16, 2012
Pintember: Ultimate Stain Remover
Smarty Pants dragged me shopping today. Yes, a teenage boy dragged me to the store!

He swore that he needed new jeans. He had grown out of his old ones. Darn those growth spurts!
Anyway...While I was at Kohl's (I had a 20% off coupon), I remembered that Picky One needed a new white dress shirt for 2 reasons. 1) He was going to need one for upcoming concerts soon. And 2) We have a bat mitzvah to go to in 2 weeks, so we might as well just by it now. These are the only reasons why my kid would be wearing a dress shirt of any kind so i should just kill 2 birds with one stone.
I had totally forgotten that he could probably wear Smarty Pant's old shirt that he just grew out of. So I called home to have Picky One try it on. It just fit. But why bother buying a new one if we already owned one that fits, right? Who says a 13 year old needs to totally button up his neck underneath his tie?
Well then, I was informed that it had armpit stains! I hate those! While playing on Pinterest one day a while back, I had seen a supposed solution. So I figured I'd try it...
The recipe listed called for 1 tsp. Dawn dish washing detergent, 3-4 tablespoons of hydrogen peroxide, and a couple tablespoons of baking soda. Now, since I only had one shirt to clean I just used 1/4 tsp Dawn, 1/2 tsp baking soda...and thanks to an over spillage of the peroxide...I have no idea how much of that I used...
It is currently sitting in the kitchen awaiting the white load to go into the washer.
I will update this post when the shirt comes out of the washer to let you know how it worked...
***UPDATE 9/17/12***I just threw the white load into the dryer and remembered that I needed to check the dress shirt. The pit stains are totally gone! I had also gotten 2 tiny spots of red Kool-aid on my good white t-shirt. So I had decided to try it since I had a little solution left...They are gone too!
WOW! I will definitely be using this recipe again!
Please let me know if you have some success with it too.
Saturday, September 15, 2012
Pintember: Gluten-free Blueberry Lemon Squares

This was a very messy dessert! But, boy was it sweet and flavorful!
The pin I got this from, actually had 15 recipes using boxed cake. And it warned that this was a particularly messy dessert.

This is the exact recipe that I started with. I guess I forgot that I changed the recipe quite a bit! I guess this recipe really inspired me to change the dessert around for several reasons. 1) I was going to party and I wanted to have a non chocolate, gluten free dessert available. 2) I only had plain blueberries on hand. and 3) I love lemon with blueberries!
This is the final recipe that I actually made. However I still need to tweak it so that it won't be quite so messy...
Gluten-free Blueberry Lemon Squares
Makes 16 bars
1 box gluten-free vanilla, white, or yellow cake mix (I used Wegman's vanilla)
1 cup quick cooking oats
1/2 cup butter (1 stick), softened
1 large egg
1 teaspoon vanilla extract
1 cups blueberries (I used frozen blueberries use what you have, fresh or frozen, or an assortment of berries)
1 cup white chocolate chips
1 cup slivered almonds
3/4 can (14-ounces) sweetened condensed milk
Preheat oven to 350F and prepare a 9-by-9 inch pan by lining it with aluminum foil and then spraying it with cooking spray. In a large mixing bowl, combine the cake mix, oats, butter, egg, vanilla and mix either with a mixer, with a spoon, or with your hands, kneading it together. The batter will be thick, tacky, and may be difficult to combine, but keep stirring or use your fingers and knead it together, adding a splash of water or milk if absolutely necessary in order to combine. Press the dough it into the prepared pan. It will be tacky, sticky, and a bit tricky to work with, but keep pressing, spreading, and finessing it.
Sprinkle the berries, then sprinkle the white chocolate chips, evenly over the top of the dough. Pour the sweetened condensed milk evenly over the top, using a spatula to gently spread and even it if necessary. Bake for 25 to 29 minutes, or until edges of bars begin to barely brown and pull away slightly from the sides of the pan, taking care not to overbake. Note that the middle will not seem very well set and although it will be bubbling, the middle will be jiggly and juicy upon removing from oven and that is okay, you want to keep these gooey. They will continue to set up more after they have cooled but don’t be alarmed if you cannot get perfect squares as these are made to be soft and gooey. Allow bars to cool well before slicing and serving. Optionally, top with whipped topping or ice cream before serving. Store in an airtight container in the refrigerator for up to a week or freeze for up to three months.
*If you do not like white chocolate, you can omit entirely or use milk or semi-sweet chocolate chips. Use slivered almonds in place of the coconut flakes if you don’t like coconut.
If I could get the toppings to be more solid...this recipe would probably not be so gooey. They were very tasty but I would much prefer to be able to eat them with my hands like a brownie...versus having to use a fork...or even a spoon, depending on how bad it is. Maybe if I put the oats in the topping part?
I would love it if someone gave me suggestions to fix this gooey mess!
Friday, September 14, 2012
Pintember: Veggie/Quinoa Burgers
I have really been wanting to try to make veggie burgers for so long! Seeing them all over Pinterest only piqued my interest even more (no pun intended). But none of the ingredient lists quite intrigued me enough to make the recipes on the pins. But 2 different ones inspired me to create my own...

and...

After I made them I asked both Picky One and his friend if they wanted them for lunch. They both said, "Sure." Picky One ate one, but, amazingly...the whole thing not just a taste and then ask, "What else can I have?" His friend Carm actually had 2. Hey if 2 young teen boys liked them they had to be good right? I also gave them to my neighborhood gluten free buddy. She liked them too...But not quite as much as those cheesy quinoa pancakes I made a few days before. My other 2 didn't even try them. I had my lunch and froze the rest with wax paper in between. (I just had a frozen one yesterday and all I had to do was break one off and nuke it. It was just as good as the day I first made them)
Now it's funny...most of the veggie burger recipes out there have very little protein in them. I thought that was the point of a burger?! And well, since I had cooked waaay too much quinoa the other day, I had plenty to use up. Good! I wanted to get some protein into my burgers.
Also I had noticed that the ones that called for sweet potatoes had you peeling them first and then shredding...isn't it much healthier to leave the peel on? Hmm...Who wrote these recipes?
Anyway...Here is what I came up with... (and yes, the picture is blurry again...I'm working on it!)

Mixed Veggie/Quinoa Burgers
1-2 T olive oil
1-2 T lemon juice
I cup spinach (I used chopped frozen and defrosted, it's what I had on hand)
1 small sweet potato, grated with skin on (1 1/2-2 cups)
1/2 red bell pepper, shredded (probably any color but green would work)
1/4 cup sweet onion, shredded or finely chopped (I used Vidalia)
2 eggs, beaten
2 T gluten free Bisquick (I would think that any type of flour would work)
1 T minced garlic
2 cup cooked quinoa
1/4 t powdered ginger
1 t cumin powder
salt and pepper to taste
Mash beans with olive oil and lemon juice in large mixing bowl to make a paste. Add the rest of the ingredients to bowl. Mix until ingredients are well combined. Refrigerate for 10 minutes. Make 1/3 cup patties. Cook covered over medium heat in olive oil for about 4 minutes on each side, adjusting for the heat of your stove/pan. Be gentle when flipping them. Serve as is or on a bun. Enjoy without the guilt of a real burger but still with a lot of flavor!
Wednesday, September 12, 2012
Pintember: Cheesy Quinoa Cakes
This was a great little protein packed side dish!

Sorry...I do not have any pictures of mine. I never checked my pictures. And when I just looked for them, they were all really blurry! I guess I will be working on taking pictures, as my buddy suggested with a month of picture taking...in the future.
Most side dishes have little to no protein. this one on the other hand has the idea of potato latkes but are made with healthy quinoa instead...so therefore...have a bunch of protein!
My hubby and the Picky One do not eat quinoa. They can't stand the texture! But they both liked these! This recipe does not make many pancakes so they each only tasted them and left them for me to eat. I can't remember what the other kid thought of them but how could he not like them? (I made them a while ago) He actually loves quinoa. So he must have loved these. Also, since I made them gluten free I gave some to my friend/neighbor who has Celiac's Disease. (We usually share gluten free things that are new/different...or just sweet.) She said they were really good. A few days later she said she still had them on her mind...They must have been really, really good! I wonder if she ever made them herself?...Carrie? Did you?
I did end up tweaking the recipe a little from the start (I didn't have or didn't want to spend the money) and I also made a change after the first small batch ('cuz things weren't quite right)...
Cheesy Quinoa Cakes
(Makes 10 to 12 small pancakes)
(Makes 10 to 12 small pancakes)
2 cups cooked quinoa
2/3 cup grated swiss cheese
3 tablespoons Gluten Free Bisquick (you could probably use any gf or regular flour)
2 sweet onions,finely chopped (I used Vidalia)
2 eggs, beaten (lots of recipes call for lightly beaten, I always beat well)
1/2 teaspoon freshly ground black pepper
salt to taste
2/3 cup grated swiss cheese
3 tablespoons Gluten Free Bisquick (you could probably use any gf or regular flour)
2 sweet onions,finely chopped (I used Vidalia)
2 eggs, beaten (lots of recipes call for lightly beaten, I always beat well)
1/2 teaspoon freshly ground black pepper
salt to taste
olive oil cooking spray
1. Place all ingredients into a mixing bowl and stir together until well combined. Season with salt and allow the mixture to sit for 5 minutes.
2. Spray large saute/fry pan with cooking oil spray.
3. Form 1/3 cup patties with the quinoa mixture and place in the heated sauté pan. (This will have to be done in batches.)
4. Cook quinoa cakes for about 5 minutes on each side. Repeat with the remaining patties until all of the cakes have been cooked.
5. I served mine with applesauce, since that is a standard potato latkes thing.
6. ENJOY!
Also...When I cooked the quinoa in preparation for this recipe...I messed up! I made waaay too much. So, tomorrow I will post the other recipe I made/created with some of the extra.
Tuesday, September 11, 2012
Pintember: Banana Crepes
I had such I sweet tooth in the morning, so I decided to try these for breakfast...
They were very good! But I have decided that when I would try it again I would probably add a tablespoon or 2 of gluten free flour. It was just missing a little substance.
My "Picky One" loved it, believe it or not! A, the one that eats most things said, "Eh..."

This is definitely an idea that I will keep, but the recipe does need to be adjusted. It is just a little too plain, for me anyway...Picky One would eat it.
All in all...a worthy pin.
Monday, September 10, 2012
Pinterest: Fabric covered storage box
This is the end result of my project...(including my earring hanger from the other day)

Here is the pin that inspired the box:

These are the before pictures...


These are the before pictures...


And here is the box's after picture...
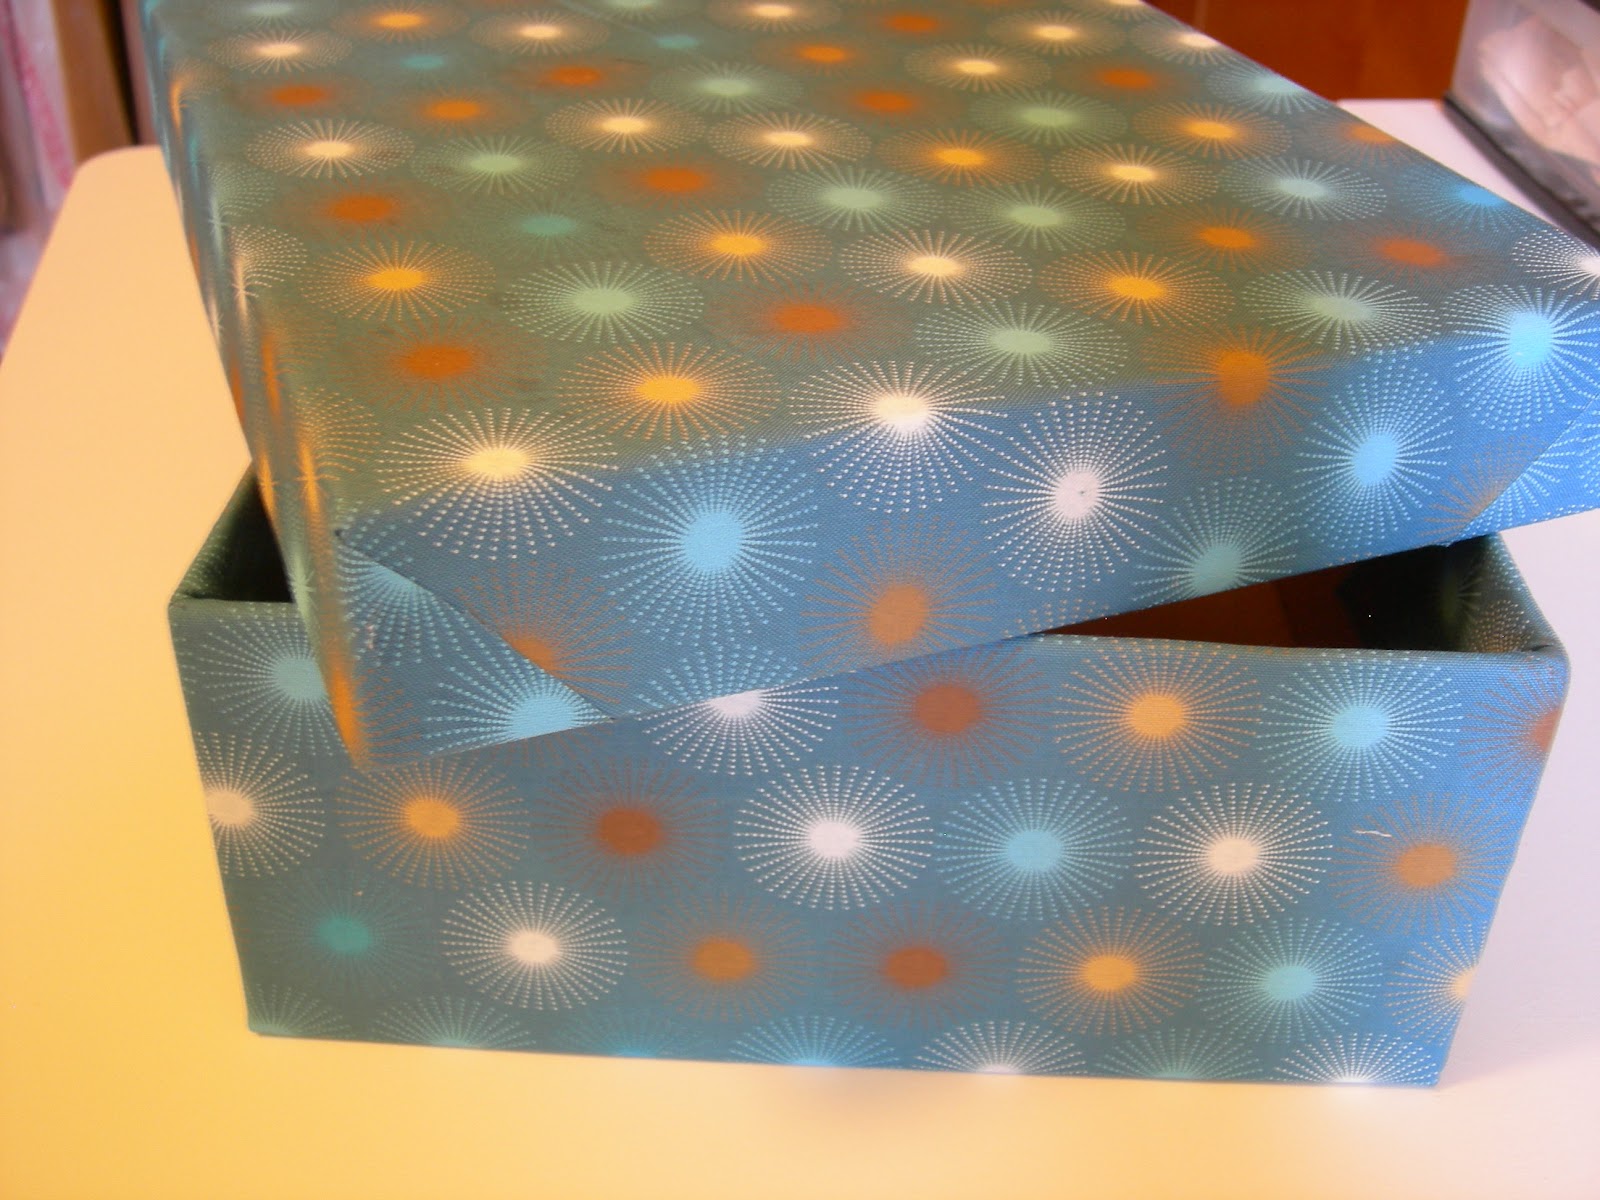
Nice huh? I love the fabric! Now I have someplace to put my papers and junk that I want to keep, but I'm not quite sure where it should go. It also inspired/encouraged me to put away some of the things that actually do have another home.
The tutorial suggests you use a glue stick. I used fabric glue. I love that stuff! I use it on everything! The tute also shows you only covering the sides with the fabric and then bottom with felt. I covered the entire box with my special fabric. I wanted the whole thing to be pretty.
As you know...the shoe box was free. This particular fabric happened to be on the clearance table at Hobby Lobby for $4 a yard (and I only needed half of it). I think I might be covering a round oatmeal container to put my receipts in so that I can keep them separate from the magazine articles I want to save. It also matches both my summer bed covering and my winter quilt. Pretty amazing! And thanks to my friend Angela that found it and suggested it in the first place!
Once again...Another great pin!
Sunday, September 9, 2012
Pintember: New York Style Cheese Cake
My 12 Year old is turning another year older!
Even though I knew that we wouldn't be home for his birthday, I asked him what kind of cake he wanted. He had no idea. So I suggested an ice cream cake. I told him I would make him one. He thought that was a good idea.
Then a few weeks later...I thought...maybe...New York Style cheese cake...
Then D raved! "That is my favorite dessert!"
So I searched Pinterest...
I used the cheese part of the recipe from here:

And the crust part from here (I like lots of crust!):

And I put it in the largest Springform pan I own...a 10 inch.
Here is the what was left of mine after the birthday celebration...A few of us had 2 pieces. It was so good!

So much for me staying low sugar and gluten free!
And the boys each had another piece of it for dessert last night (and I saved 3 individually wrapped pieces in the freezer for another day)...YUM!
Even though I knew that we wouldn't be home for his birthday, I asked him what kind of cake he wanted. He had no idea. So I suggested an ice cream cake. I told him I would make him one. He thought that was a good idea.
Then a few weeks later...I thought...maybe...New York Style cheese cake...
Then D raved! "That is my favorite dessert!"
So I searched Pinterest...
I used the cheese part of the recipe from here:
And the crust part from here (I like lots of crust!):
And I put it in the largest Springform pan I own...a 10 inch.
Here is the what was left of mine after the birthday celebration...A few of us had 2 pieces. It was so good!

So much for me staying low sugar and gluten free!
And the boys each had another piece of it for dessert last night (and I saved 3 individually wrapped pieces in the freezer for another day)...YUM!
Saturday, September 8, 2012
Pintember: Jewelry Hanger
I changed up this one a little bit. Here Is the pin that inspired me to clean up part of my mess...

Here is the problem...

In that mess there are:
3 rings
1 bracelet
1 anklet
1 watch
13 pairs of post earrings
and...
5 pairs of hook earrings!!!
What a mess! All within a 4" circle!
Every time I want something from the tiny dish I need to dump it on my bed!
And the worst part is that there are more that I would like to have easily accessible too...
So here it goes...
I will be taking 3 different sizes of embroidery hoops and filling it with a light colored crinoline, since I'm not a lace type of girl. It's a color that matches the fabric from a future project to be done this month.

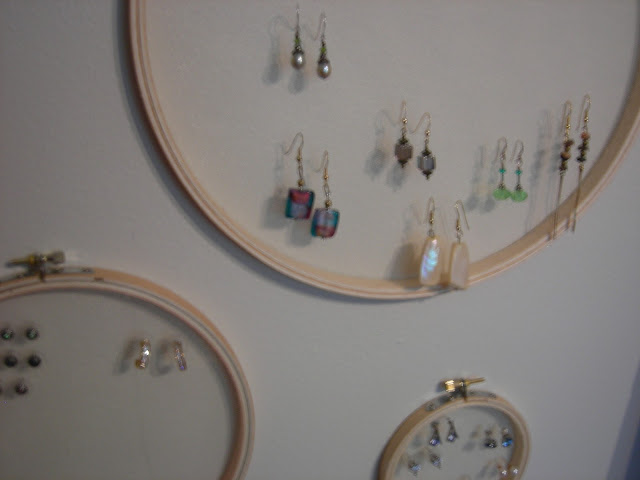
Sorry, the pictures are a little blurry. But I think you have the idea. Just so you know...I put all of my real earrings on the small ring that can be popped into my night stand in case workers or someone else are coming in the house. I also hung each ring up with just an ordinary straight pin. I have been told that they can hold up to 5 pounds each. I'm pretty sure my earrings will be safe on them!
And did you notice? There is space for plenty more!
And it only came to $4.76 plus tax! Without coupons! Thanks Hobby Lobby!
Definitely a great pin!
Friday, September 7, 2012
Pintember: Infinity scarves
Thanks to having the rest of the t-shirt leftover from yesterday's project...I could make today's...
Kinda...anyway...

I have been wanting an infinity scarf for a while now. But I'm waaay too cheap to fork up $40 bucks for one!
But I don't dye things. It's just too messy! Maybe I'll get up the guts to do it one day...
But in the mean time...I made these...They'll do just fine!
You can wear them each individually. Like these...


Kinda...anyway...
I have been wanting an infinity scarf for a while now. But I'm waaay too cheap to fork up $40 bucks for one!
But I don't dye things. It's just too messy! Maybe I'll get up the guts to do it one day...
But in the mean time...I made these...They'll do just fine!
You can wear them each individually. Like these...


Or all together. Like this...

This is the most simple way to make a scarf. Make sure you have a t-shirt with no side seams. And S-T-R-E-T-C-H!
And...DONE!
Thursday, September 6, 2012
Pintember: Recycled t-shirt necklaces
Here is the original Pinterest post that inspired today's craft:

Here are a few things I made...Sorry...they are not all fabulous pictures...


This was super simple.
Cut. S-T-R-E-T-C-H. And...wind together.
Most of the instructions out there say to use a hot glue gun. I, personally, used fabric glue so that my necklaces will be washable.
Oh...and I forgot to say...These were made from only the sleeves of the t-shirts!
So it left me with the whole rest of the shirt to do something else with...
Subscribe to:
Posts (Atom)